Wednesday, January 30, 2013

Metallic Paint - How To Get a Mirror Effect

In case you haven't heard, I am no longer Home Sweet Butterfly, but I am now the new and improved DIY 180. My web site is www.diy180.com and with blogger it's Diy180site.blogspot.com. I still have some tweaking to do, but hope to be completely done by this coming weekend. Thanks so much for sharing and spreading the news.

Now on to my favorite DIY project. I was tinkering around a few weeks back and realize I can create a mirror effect by using any metallic paint. I try using latex's paint and it didn't work, so remember metallic spray paints.

Here is what you will need -
Any glassware
Metallic paint
Spray bottle filled with plain water (no vinegar it didn't work well with the metallic paint)
A rag to dap the water and paint off.

These are the items you will need. 
Lightly mist the glassware with water. 
Next lightly spray your metallic paint and let it sit for about 40 seconds. Finally, take your rag and simply dap the water/paint beads. Remember, don't rub, but dap in a rocking motion. 
Here is the results of my plate. Love!
Look at the effect on this votive holder. See the other votive holder in the back?  
These are all the pieces I sprayed painted with the gold metallic paint and I really love how they turned out. 
I also wanted to share with you some tips if you choose to do this project. First of all, I did not use vinegar water in the spray bottle, because the metallic paint did not take well to the glass, so stick to plain water. Also, if you make a mistake or don't like the effect you got the first time around take Goop Gone and it will remove the paint off the glass. Finally, when using the rag, I didn't rub the water/paint because I found it removed too much of the paint off. I don't like this look, but you might and if you removed to much paint no worries just simply spray water and paint in the area you want to touch up or the whole entire piece. I did this and had no problems painting over the paint. Once done just lightly spray the glass pieces with sealant. Try any metallic paint you have or like to use and if you do this project please let me know. I would love to see what you created. Thanks again for stopping by and I LOVE your SWEET comments. Have a great day!

Hugs,

Vanessa


Monday, January 28, 2013

New Name and New Look!


Happy Monday! 
Today I wanted to share with you my new name and look. This has been in the works since Thanksgiving, but has been stirring in my heart since the summer of 2012. I have been growing so much within these last two years, so with new growth comes changes. I have a clear and new vision for my blog and feel the new name change is more fitting then Home Sweet Butterfly. To be honest what held me back from creating different things was me. I feared failing before I even started a project. So needless to say I have a lot of DIY projects that need to get done; like my chairs for instance.

I have a vision in the direction I am suppose to go, but I know as I continue this journey I will continue to grow and my vision will become more define.  I am learning to trust my instincts and I look forward in continuing my journey and appreciate you coming along with me. My new web address is www.diy180.com

Thank you so much for stopping by and I LOVE your sweet comment so drop me a line. 

Here is a project my sweet girl made. She is an crafter/artist in the making.


Hugs, 

Vanessa

Friday, January 25, 2013

I Love You Sign

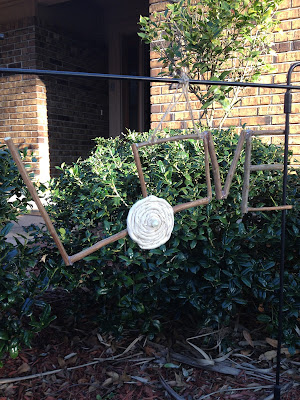
I have a simple and quick Valentine's Day sign. You will need hot glue gun, pruning scissors, twine and sticks (like from a tree). : )
As you can see, I cut the sticks and hot glue them to form the word "LOVE".
Added a sweet flower and Voile!


I just love the way it ties in with the other decor. 
My little girl wanted to make her own Valentine's wreath with a stick and berries. Too Cute!
Who said Valentine's Day decoration have to be expensive or store bought. I love how the "LOVE" sign ties in with the rest of the decor on my mantle. Thank you for stopping by and appreciate you. Have a great weekend and I LOVE to hear from you so drop me a line.

Hugs,

Vanessa

Wednesday, January 23, 2013

How To Make A Valentine's Wreath - XOXO

I wanted to show you the Valentine's wreath I made out of sticks and berries. I formed the shape out of X & O. I am really happy with the results and it only cost me $1 and that was for the ribbon. Love!


I enjoyed making this inexpensive wreath and appreciate you stopping by. If you made your Valentine's Day wreath, let me know when you leave your SWEET comments below. Have a great day! 

Hugs, 

Vanessa 

Sunday, January 20, 2013

How To Make A Burlap Wreath

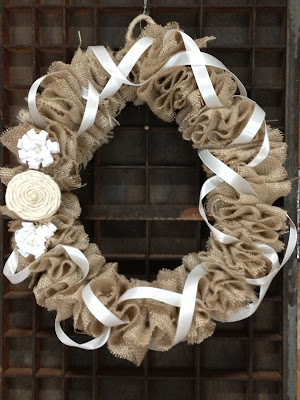
I am loving my burlap wreath I made for my mantle, so I wanted to share with you how easy is to make.


1. To cut burlap without it frying like crazy I gentle pulled on one of the ends of the string till it was out. Don't do this from the salvage edge though. My strips were 3' inches wide.
2. Once I started pulling the burlap gather as I was pulling the string out. This would be a great way to gather your burlap and sew it to a runner, pillow, table cloth the possibility are endless. 
3. Do you see all those lines this is where I made my cuts. 
4. Here are my lovely strips. 


5. Take a wire hanger and shape it out to whatever shape you want. Keep in mind the bigger the size the more burlap strips you would need. I had about 25, because you don't want the wire hanger to show. 
6. Weaving the hanger down the middle of the burlap and make sure your wreath is full, but not tight you want wiggle room. I also made sure to make a loop with the hanger so I have a way to hang my wreath. You can use a ribbon to hang your wreath as well.


When I was done I twisted my burlap so it wouldn't look so neat. I also added a creamy white satin ribbon and adding a small dap of hot glue I glued the ribbon in-between the burlap. As you can see I added some flowers as well. The cost to make this wreath was $4 dollars. I always buy my ribbon and tee shirts from the Dollar Tree. The burlap was a remnant from Walmart for $2 dollars. Sweet! 


Do you see the top of my wreath where I made a loop from the hanger to hang my wreath? Well, with the burlap strings I pulled out from Pic 1 I took all those strings, twisted them together and wrapped the loop so you couldn't see the wire hanger. Love!  
I have another inspiration for another wreath that I will share with you this week as well. I appreciate you stopping by. You Rock! Have a great week and I LOVE your SWEET comments so drop me a line. 

Hugs, 

Vanessa

Friday, January 18, 2013

Valentine Decor - Valentine's Day Mantel!

I have an update on my fireplace mantle. It's not quite your traditional Valentine's Day decor, however I wanted to add some details of this sweetheart day.


I love mixing the gold with vintage & burlap. What do you have on your mantle now? Love to see, so drop me a line, because I LOVE to hear from you. Have a great weekend.

Hugs,

Vanessa

Monday, January 14, 2013

Valentine Chalkboard Sign

I have been seeing a lot of different ways to create your own chalkboard signs, so today I am going to show you my take on how I made my Valentine's day sign.

Supplies are chalk, clean eraser, stencil and wet rag
Place your stencil on the board and lightly wet the tip of the chalk and trace.  Making the chalk a little damp helps the color come out darker.
Need to clean up some mistakes just dap the eraser on the wet rag and this method leaves straight lines too.
This is what I tell my husband all the time. I also free hand the butterfly.
This is to me a much easier processes of making a chalkboard sign and you can use different stencils. So have fun with this project and let me know if you try it. Thanks for stopping by and I Love to hear from you.

Hugs, 

Vanessa

Tuesday, January 8, 2013

What To Do With Old Christmas Cards

Hi, Friends

First off I wanted to share with you all an awesome link party taking place at One Tough Mother. Kirsten is hosting a special link party. What's so special? Well, you have to use a particular material to link up to this party. This month is burlap, so if you have a burlap project you have done or going to do link it up to One Tough Mother. Link party is live now and will close by January 22, 2013.

I wanted to give you some ideas for those beautiful Christmas cards you received from family and friends. I hate to toss any kind of greeting cards for one main reason greeting cards are so expensive. So, here are some of the ways I try to use greeting, birthday, Christmas cards. I incorporate them in my scrape book, or make post cards out of them, gift tags, labels, use them as a matte in picture frames, use as art and I decoupage with them.


I love to make them all different sizes and by using ribbon, twin, buttons, glitter or just about anything to embellish these lovely tags or post cards. Also do you see on the bottom back these two vintage Christmas cards? I gave those to my aunt back in 74 & 75. She saved them after all these years love! Do you see that handsome Santa Claus card? It came from a dear blogger all the way from the UK. This card is an actually photo she took and made into a card. You can see her beautiful work at - www.etsy.com/shop/LittlePhotoHut.


Don't tosses those expensive greeting cards out instead reused them and give them new life. Thank you for stopping by and LOVE you SWEET comments, so drop me a line. Have a great day!

Hugs, 
Vanessa